
Most users will spend the majority of their time on the home screen, also labeled Live map, monitoring activity and accessing incidents.
The Aware Intel Hub home screen serves as the central workspace for accessing real-time information, monitoring activity, and navigating the platform. The layout is designed to provide immediate situational awareness, while allowing users to quickly access key tools and data.
The system is fully responsive and optimized for desktop, tablet, and mobile devices, ensuring consistent functionality across all platforms.
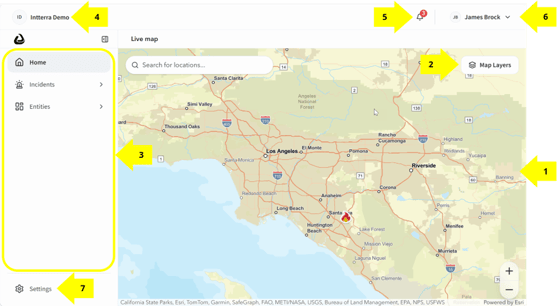
- Map (Central View)
The map is the primary visual component of the home screen and provides a real-time view of operational activity.
Users can view incidents, calls for service, cameras, weather data, and other available layers directly on the map. Available layers may also include community resources, notices or warnings, reference data, response assets, and other configured operational data. Map icons are interactive and can be selected to view additional details.
The map also allows users to:- Show or hide data layers
- Search for specific locations
- The search bar can be used to search for a location and reposition the map.
- Zoom in and out to adjust the level of detail
- Open or close the Map Layers panel
- Map Layers Button
The Map Layers button opens the Map Layers panel on the right side of the map. This panel allows users to control which map layers are visible and review the map legend. The panel includes two tabs: Layer and Legend.
The Layer tab includes a search field for locating specific layers. Layers are organized into categories such as All Hazards / Incidents, Cameras, Community Resources, Notices / Warnings, Reference Data, Response Assets, and Weather. Each category shows how many layers are currently selected out of the total available layers. Users can expand a category to view the individual layers within it and turn layers on or off as needed.
The Legend tab displays the map legend and shows what the different map icons and symbols represent. Users can search the legend or filter legend items by All, Visible, or Hidden to control which items are displayed. - Sidebar (Left Panel)
The sidebar provides quick access to the main areas of the platform. The content of the sidebar may vary depending on user role, permissions, and agency configuration.
The primary sidebar options include Home, Incidents, Entities, and Settings.
The sidebar is designed to give users fast access to relevant information and administrative tools without needing to search the map. - Agency Identifier (Top Left)
The agency identifier appears in the top-left area of the interface and displays the active agency or tenant context. This helps users confirm which agency environment they are currently viewing. - Notifications
The notification bell is located in the top-right area of the screen. A badge may appear on the bell when unread notifications are available.
Users may receive notifications for:- Incident updates
- Approval requests
- Other system-generated events
- Selecting the notification bell displays a notification pop-up with additional notification information.
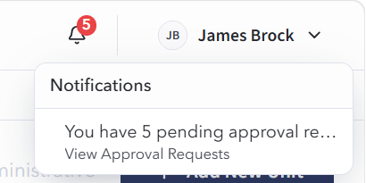
Depending on the notification type, users may be able to open the related record or review additional details.
Selecting View Approval Requests from the notification pop-up opens the Approval Requests screen, which is covered later in this guide.
- User Menu (Top Right)
The User Menu is located in the top right corner of the home screen and is identified by the display of the logged-in user’s name.
Selecting the User Menu provides quick access to personal settings and system options.
A more detailed overview of the User Menu and its available features is provided later in this guide. - Settings
The Settings option appears in the lower-left area of the sidebar for users with appropriate permissions. It provides access to administrative tools used to manage access, organization information, and system configuration.
Administrative settings are covered later in this guide.