
To create an incident, users must have specific permissions within the system. If you do not have access to create incidents, contact your system administrator.
There are two ways to create a new incident within the system:
- Create a new incident manually – Start a new incident from a blank slate by entering all relevant details.
- Create an incident from an existing Call for Service (CFS) – Convert an existing Call for Service into a fully managed incident, carrying over available information from the map into the incident record.
Option 1: Create a New Incident Manually
- Select Incidents from the sidebar.
-
Select + Create Incident in the top-right corner.
- Complete the required incident fields. Required fields are marked with an asterisk (*).
- Add location information, links in the View Links section, and additional incident details as needed. Attachments can be added after the incident has been saved.
- Select Save at the bottom of the screen to create the incident.
- After the incident is saved, the incident details screen remains open. At the top-right corner, the incident status displays as Not Published in the Status dropdown. The Merge Incident and Edit buttons are also available from this screen.
- Select the Status dropdown next to Not Published, then select Submit for Approval.
- The Review pane opens. Review all incident content carefully.
- When the incident is ready to be reviewed for publishing, select Submit for Approval at the bottom-right corner of the Review pane.
- After the incident has been submitted, the Status dropdown at the top-right corner of the incident details screen updates to Pending Approval.
Option 2: Create an Incident from a Call for Service
-
From the home screen, select Entities, then choose Calls for Service. If available, Calls for Service may also be accessed directly from the sidebar.
-
Click on CFS ID for the desired Call for Service
- Click + Create Incident (top right)
- Complete or update the desired incident details (see below)
- Select Save at the bottom of the screen to create the incident.
- After the incident is saved, the incident details screen remains open. At the top-right corner, the incident status displays as Not Published in the Status dropdown. The Merge Incident and Edit buttons are also available from this screen.
-
Select the Status dropdown next to Not Published, then select Submit for Approval.
-
The Review pane opens. Review all incident content carefully.
- When the incident is ready to be reviewed for publishing, select Submit for Approval at the bottom-right corner of the Review pane.
-
After the incident has been submitted, the Status dropdown at the top-right corner of the incident details screen updates to Pending Approval.
Incident Details
When creating an incident, complete the following fields as applicable:
- Incident Name
Enter the incident name as designated by the incident commander or dispatch center - Incident Type
Select the appropriate type for the incident. Selecting “Wildfire” as the incident type will display an additional “Wildfire Details” section later in the Incident Details screen. - Incident Status
Indicates the current state of the incident:- Planned - The incident has been identified or scheduled but is not yet active.
- Active – The incident is ongoing and requires response or coordination.
- Monitoring – The incident is being watched for changes, but no active response actions are currently required.
- Resolved - The incident has been addressed, and no further response action is expected.
- Closed – Incident response has concluded, and the incident record is finalized.
- Merged - The incident has been merged with another related incident record.
- Incident Start Date/Time
Enter the date and time the incident began. Users can select the date and time manually, or select Now to automatically enter the current date and time. - Incident End Date/Time
Enter the date and time the incident concluded, if applicable. Users can select the date and time manually, or select Now to automatically enter the current date and time. - Agencies Having Jurisdiction
Select the agency or agencies responsible for the incident. Multiple agencies can be selected. Selecting more than one agency will change the incident from a single-agency event to a Unified Command event, allowing all participating agencies to access, edit, and provide status updates to the incident. Incidents not initially created under Unified Command can be updated at any time to add additional agencies and transition to a Unified Command event. - Cooperating Agencies
Select one or more agencies that are assisting with the incident but do not have jurisdiction over it. Multiple cooperating agencies can be selected. This field helps distinguish agencies responsible for the incident from other agencies providing assistance or support. Cooperating agencies can be added or updated at any time by editing the incident. - Incident Management Team
Select the appropriate management team from the dropdown - Incident Description
Enter a summary of the incident based on currently available information
(This can be updated as new information becomes available).
Note: Information entered in the Incident Description field will be included in the public-facing incident information once the incident is approved and published. Users should review this content carefully before submitting the incident for approval.
- Incident Location
Select Address or Coordinates for the incident location. When Address is selected, users can search for the address and complete the available address fields. When Coordinates is selected, users can enter latitude and longitude values. - Location – Description
Enter additional details to help describe the location (e.g., landmarks, directions, or specific areas) - Counties
Select one or more counties associated with the incident - Damage Assessment
The Damage Assessment section allows users to enter numerical information about the impacts of the incident. Complete the available fields as applicable:- Structures
- Structures Destroyed
- Structures Damaged
- Structures Evacuated
- Structures Threatened
- Population
- Impacted Population
- Civilians
- Civilian Fatalities
- Civilian Injuries
- Firefighters
- Firefighter Fatalities
- Firefighter Injuries
- Structures
All Damage Assessment fields are numerical fields and can be updated as additional information becomes available.
Note: For incidents associated with an IRWIN ID, supported casualty and structure damage information may be automatically updated from IRWIN.
- Wildfire Details
If “Wildfire” is selected as the Incident Type, an additional “Wildfire Details” section will appear below the Incident Location section within the Incident Details screen.
This section provides the following additional fields specific to wildfire incidents:- Cause of Fire
Select the appropriate cause from the dropdown menu - Acres Burned
Enter the number of acres burned (if known) - Fuel Type
Select the appropriate fuel type from the dropdown menu - Percent Containment
Enter the percentage of containment (if known) - Containment Date/Time
Enter the date and time of wildfire containment (if applicable) - Control Date/Time
Enter the date and time of wildfire control (if applicable)
- Cause of Fire
These fields can be updated as incident conditions change or additional information becomes available. Containment and control information may not be known when the incident is first created. When a valid IRWIN ID has been added to the incident as an External System Identifier, supported wildfire information, including acreage and percent containment, is automatically updated from IRWIN. Otherwise, users should update these fields throughout the lifecycle of the incident as needed.
- Evacuation Information
The Evacuation Information section allows users to add public-facing evacuation information to an incident. Evacuation Information can be added when creating a new incident or when editing an existing incident.
Evacuation Information appears in the Aware public-facing app after the incident is published. When a user opens the incident containing evacuation information in the app, a View Evacuation Information button appears below the incident title. Selecting this button displays the evacuation type followed by the description entered for that alert.
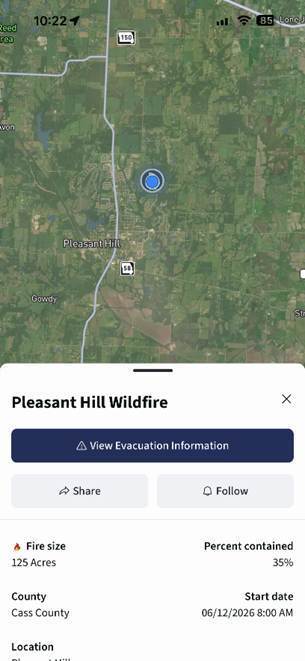
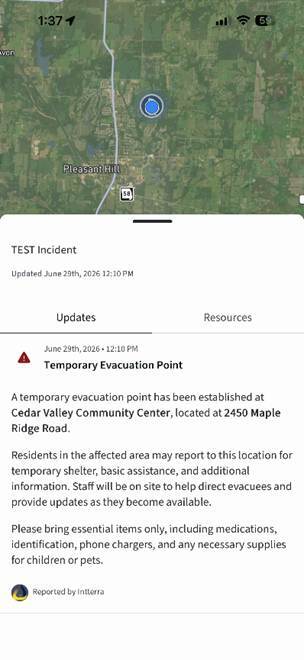
To add evacuation information:
- In the Evacuation Information section, select Add Evacuation Information.
- Select an evacuation type, such as an evacuation order, evacuation warning, shelter in place, or another available alert type.
- Enter a description for the selected evacuation type.
- Continue completing or updating the incident.
Once the incident is approved and published, the evacuation information is visible to the public through the Aware app.
Evacuation information can be added to an incident at any time. To add evacuation information after an incident has already been created, open the incident, select Edit, add the evacuation information, save the incident, and submit it for approval again if approval is required.
When editing an already published incident, notifications are only generated for evacuation information with evacuation types of Evacuation Warning or Evacuation Order.
- Map
Displays the incident location based on the provided address or coordinates. - Perimeter
The Perimeter section allows users to add a GeoJSON perimeter file to the incident before the incident is saved. This can be used to include a geographic boundary or perimeter associated with the incident.
To add a perimeter file, drag and drop a GeoJSON file into the upload box, or select the box to browse for the file. The upload box displays the message Drop a GeoJSON perimeter file or click to browse.
Perimeter files must be in GeoJSON format and cannot exceed 5 MB. - Attachments
Attachments can be added to an incident after the incident has been saved. Attachments can be documents, images, or videos.
Important: Attachments cannot be added during the initial incident creation process before the incident record has been saved. To add attachments, users must first create and save the incident, then edit the saved incident record.
To add attachments to an incident:
-
- Create and save the incident.
- Open the saved incident.
- Select Edit.
- Locate the Attachments section.
- Click the + sign next to Attachments to open the Add Attachments window.
- In the Add Attachments window, browse for a file or drag and drop the file into the upload area.
- Review the selected file.
- Select Add Files.
- Save the incident changes.
If the incident has already been submitted for approval or published, adding attachments can trigger the approval process again. Users should review the incident carefully before submitting updated content for approval.
Note: Incident attachments support common document, image, text/data, spreadsheet, compressed archive, and video formats. The default file size limit is 100 MB per attachment. This limit is configurable if a different maximum size is needed. For a full list of supported attachment file types, see Appendix A: Supported Incident Attachment File Types.
- View Links
Add external links relevant to the incident. These can include community resources, trusted partner links, or other sources that provide additional context and information.
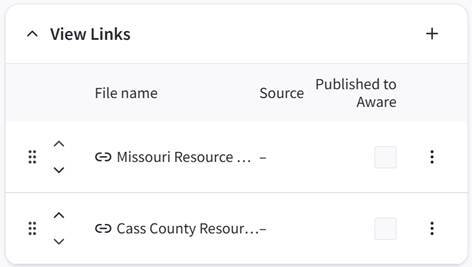
Links can be added by selecting the plus icon in the View Links section. In the Add Link window, enter the Link Name and Link URL, then select Save.
When more than one link has been added, the links can be reordered. To reorder links, drag a link using the six-dot handle on the left side of the row, or use the up and down arrows to move the link higher or lower in the list. This is helpful when more important links should appear at the top.
- External System Identifiers
External system identifiers can be used to associate an incident with a matching record from another system. This section is optional and is not required to create or save an incident.
Available systems include IRWIN, CAL FIRE, and agency-specific CAD or Call for Service systems. Depending on the agency, these systems may be identified using CAD or CFS (Call for Service) in the system name.
When an incident is created from an existing Call for Service, the associated CAD or Call for Service identifier is automatically added to the incident. Users can also manually add an identifier by selecting the + sign next to External System Identifiers, selecting the appropriate agency/system from the System dropdown, entering the corresponding identifier in the ID field, and selecting Save.
When a valid IRWIN ID is added, the incident is associated with the corresponding IRWIN record and supported incident information is automatically updated from IRWIN. This includes acreage, percent containment, casualty information, and structure damage information when available.
A CAL FIRE identifier can be added to associate the incident with the corresponding CAL FIRE incident. The CAL FIRE identifier provides the association only and does not enable any additional automated functionality or incident updates.
Once the identifier has been added, continue with saving or updating the incident.