
Incident Status Updates are used to communicate new or evolving information related to an incident after it has been created. Status updates provide a chronological record of changes, progress, and key developments.
Rather than modifying the original incident description for each new development, users should add status updates to keep incident information organized and easier to follow.
Status updates can be used for information such as:
- Changes in incident conditions
- Updated public instructions
- Progress updates
- Road closure changes
- Evacuation information
- Containment or control updates
- Other important incident developments
Add a Status Update
To add a status update:
- Open the desired incident.
- Scroll down to the Status Updates section.
- Select + New Status Update.
- In the New Status Update window, complete the update details:
- Category - Select the appropriate update category.
- Pin to Top - Toggle on to pin the update to the top of the list.
- Content - Enter the update information.
- Attachments - Add any relevant images or videos.
- Select Submit for Approval at the bottom-right corner of the New Status Update window.
If an approval process is configured, the status update is submitted for approval and displays as Pending Approval in the Status Updates section of the Incident Details screen.
The status update will not be published to the Aware Portal until it is approved.
Edit a Status Update
Users with appropriate permissions can edit status updates at any time.
To edit a status update:
- Open the desired incident.
- Scroll down to the Status Updates section.
- Locate the update you wish to modify.
- Select the pencil icon to edit.
- Make the necessary changes.
- Select Save Changes.
Note: Edits can trigger the approval process if approval is configured.
Approving a Status Update
Depending on agency configuration, status updates may require approval before they are published to the portal.
When a status update is submitted for approval, approvers are notified through the notification bell at the top of the screen. The pending status update also appears in the Status Updates section of the related Incident Details screen with a Pending Approval status and a Review button.
Approvers can review and act on the status update from the Approval Requests screen or directly from the associated Incident Details screen.
Approving Your Own Status Update
If an approver is reviewing a status update that they submitted themselves, an additional confirmation checkbox appears in the Review Status Update window. The checkbox confirms that the approver has received the appropriate approval from the appropriate authority to publish the change to AwareCA.
The checkbox is not selected by default and must be selected manually before the status update can be approved and published. After selecting the confirmation checkbox, select Approve and Publish to complete the approval.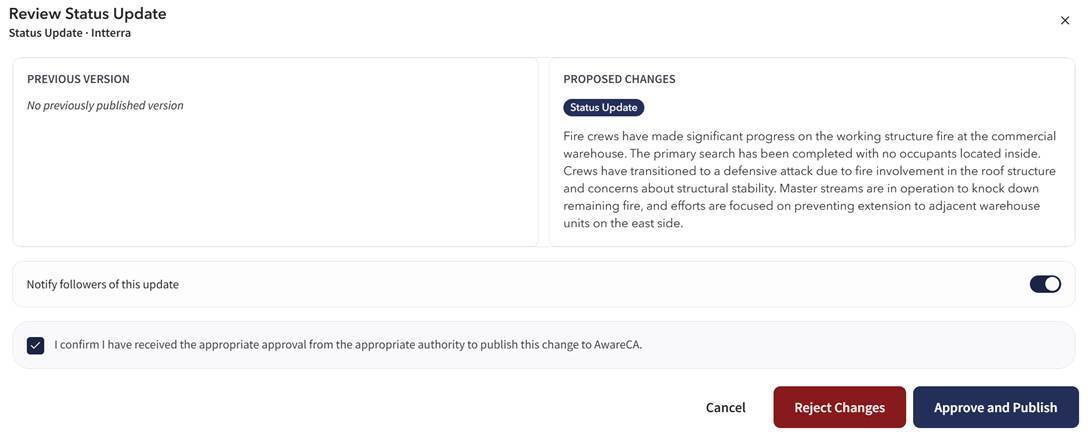
The confirmation checkbox is shown selected above for reference. It is not selected by default and must be manually selected when approving your own status update.
Approving a Status Update from the Notification Bell or Approval Requests Screen
To approve a status update from the notification bell or Approval Requests screen:
- Select the notification bell at the top of the screen.
- Open the status update publish approval request from the notification list, or select View Approval Requests to open the Approval Requests screen.
- Locate and open the status update approval request.
- Review the status update content and related incident information.
- Select Approve and Publish to approve and publish the status update.
If the status update should not be approved, select the deny or reject action. When rejecting the request, enter the reason for rejection. The user who submitted the status update can use the rejection reason to correct and resubmit the content if needed.
Approving a Status Update from the Incident Details Screen
To approve a status update from the Incident Details screen:
- Open the associated incident.
- Scroll to the Status Updates section.
- Locate the status update marked as Pending Approval.
- Select Review for the pending status update.
- Review the status update content in the Review Status Update window.
- Select Approve and Publish to approve and publish the status update.
If the status update should not be approved, select Reject Changes. When rejecting the request, enter the reason for rejection.
Approvers should review the status update carefully before approving it because approved status updates become visible on the portal.