
The Lookup Tables section is used to configure shared reference values used throughout the Aware Intel Hub.
Lookup tables map agency-specific codes and values to standardized platform values. These mappings help ensure that incoming data is interpreted consistently across the platform.
This section is primarily intended for system administrators or users with lookup table management permissions. Access to this section and available actions depend on user role, permissions, and agency configuration.
Lookup Tables Screen
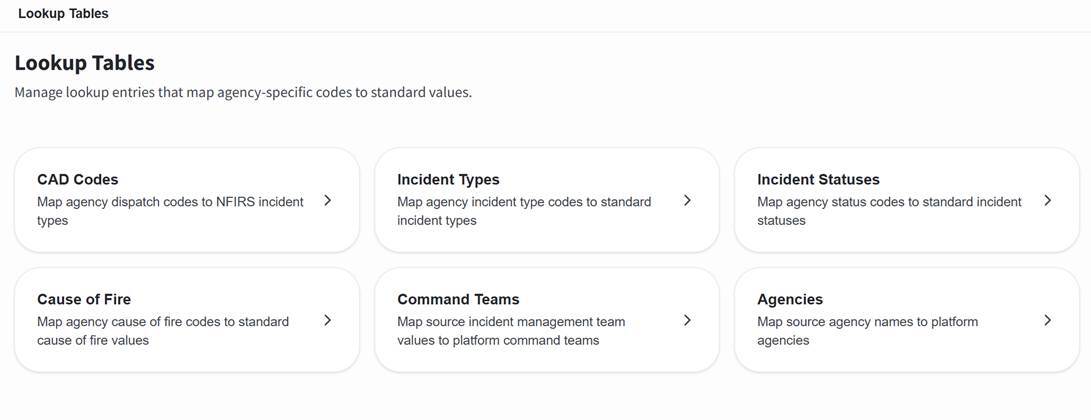
The Lookup Tables Screen can be accessed by selecting Settings, then choosing Lookup Tables under System Configuration.
The Lookup Tables Screen displays lookup table categories. Each category represents a different type of shared reference value.
The Lookup Tables Screen includes the following lookup table categories:
- CAD Codes: Map agency dispatch codes to NFIRS incident types
- Incident Types: Map agency incident type codes to standard incident types
- Incident Statuses: Map agency status codes to standard incident statuses
- Cause of Fire: Map agency cause of fire codes to standard cause of fire values
- Command Teams: Map source incident management team values to platform command teams
- Agencies: Map source agency names to platform agencies
Opening a Lookup Table Category
To open a lookup table category:
- Open the Lookup Tables section.
- Select the lookup table category you want to review.
Opening a lookup table category takes you to the lookup category screen for that category.
Lookup Category Screen
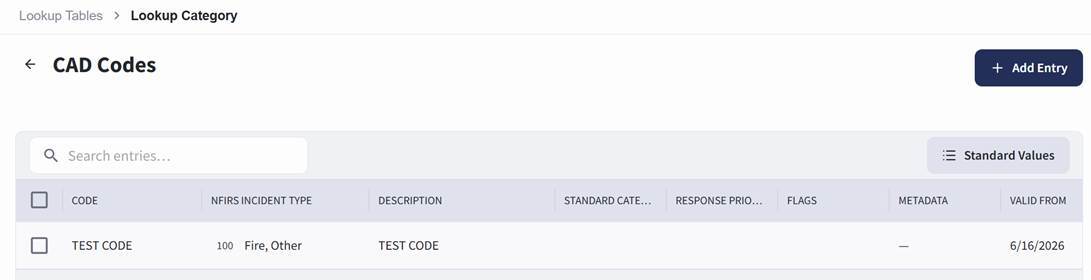
The Lookup Category Screen displays lookup entries for the selected category.
The lookup entries table displays the entries that have been configured for the selected lookup category.
If no entries have been created, the table displays No data available.
Standard Values
The Standard Values button opens a side panel showing the standard reference values available for the selected lookup category.
Users can review the standard reference values when deciding how an agency-specific code should be mapped.
Adding a Lookup Table Entry
Users with the appropriate permissions can add a lookup table entry from the lookup category screen.
To add a lookup table entry:
- Open the Lookup Tables section.
- Select the lookup table category that needs to be updated.
- Select + Add Entry.
- Complete the fields provided. Required fields are marked with an asterisk (*).
- Select Save.
If the entry should not be saved, select Cancel.
The standard mapped value field changes depending on the selected lookup category.
Examples include:
- CAD Codes: NFIRS Incident Type
- Incident Types: Standard Type
- Incident Statuses: Standard Status
- Cause of Fire: Standard Cause of Fire
- Command Teams: Command Team
- Agencies: Platform Agency
Managing Lookup Table Entries
After a lookup table entry has been created, it appears in the table for that lookup table category.
Each entry includes a checkbox on the left side of the row. Selecting one or more checkboxes allows users to delete selected entries from the table. When at least one entry is selected, the Delete Selected button appears at the top-right of the table.
Each entry also includes row actions on the far right side of the table. These actions include an Edit button, shown as a pencil icon, and a Delete button, shown as a trash can icon.
Editing a Lookup Table Entry
Users with the appropriate permissions can edit an existing lookup table entry.
To edit a lookup table entry:
- Open the Lookup Tables section.
- Select the lookup table category that contains the entry.
- Locate the entry in the table.
- Select the Edit button, shown as a pencil icon, on the far right side of the entry row.
- Update the necessary entry information on the Edit Entry screen.
- Select Save.
If the entry should not be updated, close the screen or select the available cancel option.
Deleting a Single Lookup Table Entry
Users with the appropriate permissions can delete an individual lookup table entry.
To delete a single lookup table entry:
- Open the Lookup Tables section.
- Select the lookup table category that contains the entry.
- Locate the entry in the table.
- Select the Delete button, shown as a trash can icon, on the far right side of the entry row.
- When the confirmation window appears, select Delete Entry.
If the entry should not be deleted, select Cancel.
Deleting Multiple Lookup Table Entries
Users with the appropriate permissions can delete multiple lookup table entries at one time.
To delete multiple lookup table entries:
- Open the Lookup Tables section.
- Select the lookup table category that contains the entries.
- Select the checkbox next to each entry that should be deleted.
- Select Delete Selected at the top-right of the table.
- Confirm the deletion when prompted.
Selecting multiple checkboxes allows users to delete more than one entry at the same time. Administrators should review the selected entries carefully before confirming deletion.
Administrators should review lookup table entries carefully. Incorrect lookup mappings can cause agency data to appear under the wrong category, display inconsistently, or fail to align with expected platform behavior.