
The Organization section is used to manage the organization profile, security policies, single sign-on settings, terms and conditions, and organization-related event history.
This section is primarily intended for system administrators or users with organization management permissions. Access to this section and available actions depend on user role, permissions, and agency configuration.
Your Organization Screen
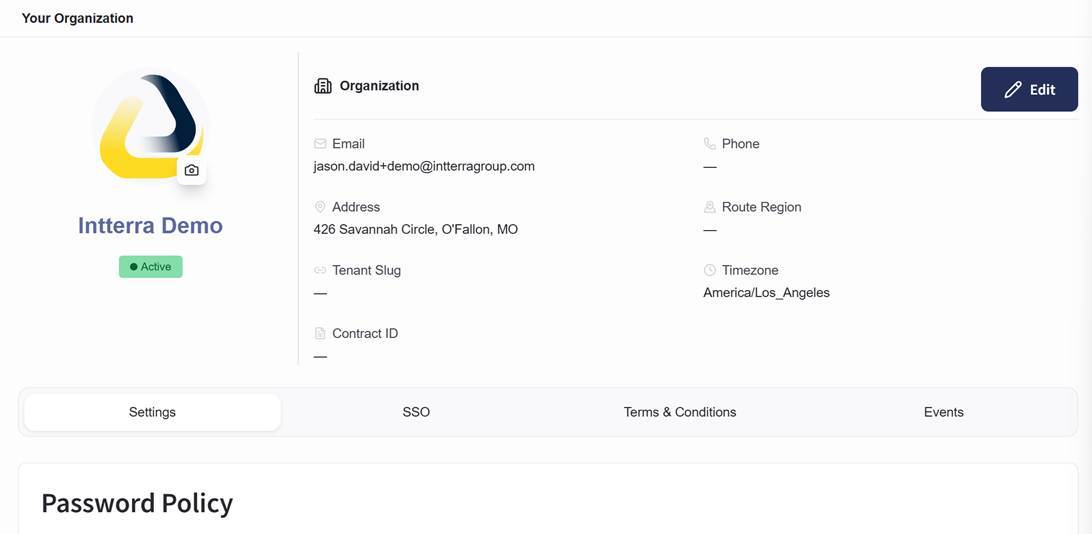
The Your Organization screen can be accessed by selecting Settings, then choosing Organization under System Configuration.
The Your Organization screen displays organization information at the top of the page, including the organization logo, organization name, active status, and organization details.
The Your Organization screen includes the following tabs:
- Settings
- SSO
- Terms & Conditions
- Events
An Edit button is available in the top-right corner of the screen.
Editing Organization Information
Users with the appropriate permissions can edit organization information from the Your Organization screen.
To edit organization information:
- Open the Organization section.
- Select Edit in the top-right corner.
- Update the organization information.
- Select Save.
If the changes should not be saved, select Cancel.
Settings Tab
The Settings tab is used to manage organization-level policy settings.
The Settings tab includes:
- Password Policy
- Login Policy
- MFA Policy
Password Policy
The Password Policy section defines password requirements that apply to users in the organization.
To update the password policy:
- Open the Organization section.
- Select the Settings tab.
- Review the Password Policy section.
- Update the password requirements.
- Select Save Policy.
If the changes should not be saved, select Cancel.
Login Policy
The Login Policy section configures account lockout settings after failed login attempts.
To update the login policy:
- Open the Organization section.
- Select the Settings tab.
- Review the Login Policy section.
- Update the login policy settings.
- Select Save Login Policy.
If the changes should not be saved, select Cancel.
MFA Policy
The MFA Policy section configures multi-factor authentication requirements for users in the organization.
To update the MFA policy:
- Open the Organization section.
- Select the Settings tab.
- Review the MFA Policy section.
- Select the appropriate MFA requirement.
- Select Save MFA Policy.
If the changes should not be saved, select Cancel.
SSO Tab
The SSO tab is used to manage single sign-on settings for the organization.
The SSO tab includes:
- Intterra Login
- Identity Providers
- Signing Certificates
Intterra Login
The Intterra Login setting controls whether users can sign in to the tenant using their Intterra credentials.
When enabled, users can sign in to this tenant with their Intterra credentials. When disabled, users are required to sign in through an external identity provider.
Administrators should confirm that at least one external identity provider is configured and enabled before disabling Intterra Login. If Intterra Login is disabled without a working external identity provider, users may be unable to sign in.
Identity Providers
The Identity Providers section displays external identity providers configured for tenant login.
To add an identity provider:
- Open the Organization section.
- Select the SSO tab.
- Select + Add Identity Provider.
- Complete the identity provider fields. Required fields are marked with an asterisk (*).
- Select Create.
If the identity provider should not be created, select Cancel.
Signing Certificates
The Signing Certificates section is used to manage signing certificates for identity provider configuration.
To add a signing certificate:
- Open the Organization section.
- Select the SSO tab.
- Select + Add Certificate.
- Enter the certificate Name.
- Paste the Certificate (PEM) value.
- Select Add.
If the certificate should not be added, select Cancel.
Terms & Conditions Tab
The Terms & Conditions tab is used to manage the terms and conditions shown to users at login.
When terms and conditions acceptance is enabled, users see the terms and conditions screen after each successful login.
When terms and conditions acceptance is disabled, users bypass the terms and conditions screen and go directly to the main application.
Changes apply immediately and take effect for new login sessions. Users who are already logged in will see the change on their next login.
To update terms and conditions:
- Open the Organization section.
- Select the Terms & Conditions tab.
- Turn Require terms & conditions acceptance at login on or off.
- Enter or update the terms and conditions text in the content editor.
- Select Preview to review the content.
- Select Save Terms & Conditions.
Events Tab
The Events tab displays organization-related event history.
To review organization events:
- Open the Organization section.
- Select the Events tab.
- Use the search bar or table tools to locate the event information.
- Review the event details in the table.