
The Users section is used to manage agency user accounts, invitations, and access within the Aware Intel Hub.
Users are individuals who have the ability to sign in to the system. User accounts control who can access the platform and what each person can view or do based on assigned roles, groups, login restrictions, and authentication settings.
This section is primarily intended for system administrators or users with user management permissions. Access to this section and available actions depend on user role, permissions, and agency configuration.
User Management Screen
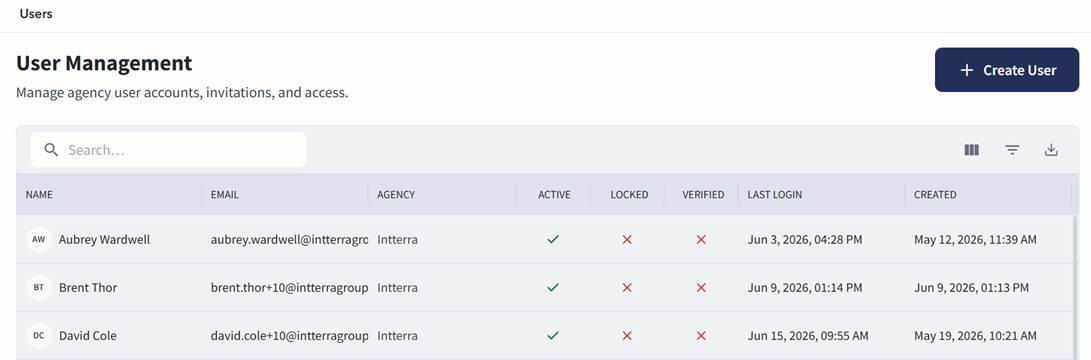
The User Management screen can be accessed by selecting Settings, then choosing Users.
The User Management screen displays user accounts in a table.
Searching for Users
To search for a user:
- Open the Users section.
- Use the search bar on the User Management screen.
- Enter the user’s name, email address, agency, or other available search information.
- Review the filtered results in the user table.
- Select the user record to review additional details.
Creating a User
Users with the appropriate permissions can create a new user from the User Management screen.
To create a user:
- Open the Users section.
- Select + Create User from the top right.
- Complete the fields provided. Required fields are marked with an asterisk (*).
- Assign the user to the appropriate groups. Assign individual roles only when needed.
- Select Create User at the bottom of the page.
Important: When assigning access, groups should generally be used when possible. Groups provide a cleaner and more efficient way to manage permissions because access can be maintained at the group level instead of assigning and updating permissions one user at a time.
Roles can still be assigned directly when needed, but group-based access is preferred for consistency and easier long-term management.
User Details Screen
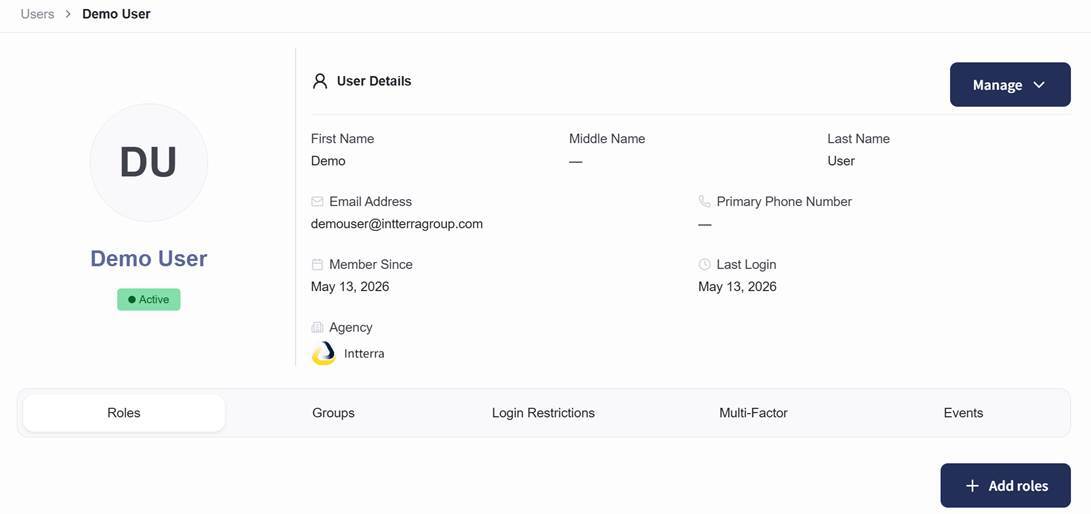
Opening an existing user record takes you to the User Details Screen.
To open an existing user record:
- Open the Users section.
- Locate the user in the User Management table.
- Select the user record.
The User Details Screen displays information associated with the selected user account, including user identity, agency association, account status, assigned access, login restrictions, multi-factor authentication information, and user events.
The User Details Screen includes a Manage button and tabs for:
- Roles
- Groups
- Login Restrictions
- Multi-Factor
- Events
Manage Menu
The Manage button provides access to user account management actions.
The Manage menu includes:
- Edit User
- Resend Verification Email
- Send Password Reset
- Require Password Change
- Disable User
- Delete User
Editing a User
Users with the appropriate permissions can edit existing user accounts.
To edit a user:
- Open the Users section.
- Select the user account you want to update.
- Select Manage.
- Select Edit User.
- Update the necessary user information.
- Select the update option at the bottom of the page.
- Review the user record to confirm the updates were applied.
Resending a Verification Email
Users with the appropriate permissions can resend the verification email used to verify a user’s account.
To resend a verification email:
- Open the Users section.
- Select the user account.
- Select Manage.
- Select Resend Verification Email.
- Confirm the action when prompted.
This sends the user a new verification email used to verify the account.
Sending a Password Reset
Users with the appropriate permissions can send a password reset to an existing user.
To send a password reset:
-
Open the Users section.
-
Select the user account.
-
Select Manage.
-
Select Send Password Reset.
-
Confirm the action when prompted.
This sends the user instructions for resetting their password.
Requiring a Password Change
Users with the appropriate permissions can require a user to change their password.
To require a password change:
- Open the Users section.
- Select the user account.
- Select Manage.
- Select Require Password Change.
- Confirm the action when prompted.
The user will be required to update their password the next time they sign in.
Disabling a User
Users with the appropriate permissions can disable a user account.
To disable a user:
- Open the Users section.
- Select the user account.
- Select Manage.
- Select Disable User.
- Confirm the action when prompted.
Disabling a user prevents the user from accessing the system. Administrators should confirm the correct user account has been selected before disabling access.
Deleting a User
Users with the appropriate permissions can delete a user account.
To delete a user:
- Open the Users section.
- Select the user account.
- Select Manage.
- Select Delete User.
- Confirm the action when prompted.
Deleting a user removes the user account from system access. Content, records, or activity previously created or modified by that user are not removed when the user account is deleted. Historical records, audit history, incident updates, approvals, and other system activity associated with that user remain in the system.
Administrators should confirm the correct user account has been selected before deleting the user.
Roles Tab
The Roles tab displays roles assigned to the selected user.
Roles define what the user can access or perform within the platform.
To review user roles:
- Open the Users section.
- Select the user account.
- Select the Roles tab.
- Review the roles assigned to the user.
- Roles can be added by selecting the + Add Roles button
Important: When assigning access, groups should generally be used when possible. Groups provide a cleaner and more efficient way to manage permissions because access can be maintained at the group level instead of assigning and updating permissions one user at a time.
Roles can still be assigned directly when needed, but group-based access is preferred for consistency and easier long-term management.
Groups Tab
The Groups tab displays groups assigned to the selected user.
Groups provide a repeatable permission structure and should generally be used when assigning access. Managing access through groups helps keep user permissions consistent and easier to maintain.
To review user groups:
- Open the Users section.
- Select the user account.
- Select the Groups tab.
- Review the groups assigned to the user.
- Groups can be added by selecting the + Add Groups button
Login Restrictions Tab
The Login Restrictions tab displays login restriction settings associated with the selected user.
Login restrictions are used to control or limit user access based on configured security requirements.
To review login restrictions:
- Open the Users section.
- Select the user account.
- Select the Login Restrictions tab.
- Review the login restriction information.
Multi-Factor Tab
The Multi-Factor tab displays multi-factor authentication information associated with the selected user.
To review multi-factor authentication information:
- Open the Users section.
- Select the user account.
- Select the Multi-Factor tab.
- Review the multi-factor authentication information.
Events Tab
The Events tab displays user-related events associated with the selected user account.
This area can be used to review account activity and system events related to the user.
To review user events:
- Open the Users section.
- Select the user account.
- Select the Events tab.